Make Your Own Spanish Guitar - online book
Complete plans & Instruction on how make your own Spanish Guitar.
| Share page | Visit Us On FB |
|
27 |
|||
|
|
|||
|
quired and the work of fitting should be done from the sides of the dovetail slot cut in the top block to the end of the instru�ment, where a neat join is made.
It is not advisable to use plastic banding on a Spanish guitar.
Proceed to band the back of the guitar in a similar manner.
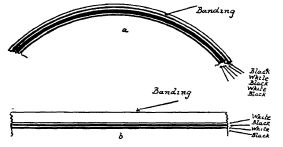
It adds a nice appearance to the front of the instrument if a band or two of purfling is inserted inside the banding on the face and below it on the sides. This purfling� which can be two or more bands of con�trasting woods as shown at (a) and (b) in Fig. 29�is inset to about one third of the thickness of the face and sides. |
purfling should be scraped down to the level of the face and sides and finally smoothed off with fine glasspaper. The corner of the banding can then be neatly rounded with fine glasspaper.
GLUEING THE FINGER BOARD
We can now glue the fingerboard to the neck, having first successfully glued the lat�ter into the body.
Here it might be mentioned that the fret slots are cut after the fingerboard is fitted to the neck. If they were cut before fitting the fingerboard the slots in the wood would cause it to buckle and make it difficult for glueing.
The fingerboard not only covers the face of the neck but extends over the front of die guitar up to the top arc of the soundhole so, before attempting to glue the fingerboard in position, mark that part of the guitar front that will be covered and roughen it slightly.
Well warm both sides of the fingerboard before glueing it (using very strong glue for this work) and, when it has been placed in position on the neck (making certain that |
||
 |
|||
|
|
|||
|
Fig. 29.�Showing how a band or two of black
purfling (which adds to the appearance of the
guitar) can be fitted inside the banding on the face
and below it on the sides.
Before attempting to fit this purfling the banding must be finished off square with side and face to enable the cutting gauge or scratcher to have a true guide.
PURFLING
Set the cutting tool to exactly the same width as the purfling it is proposed to in�lay and go round the edge of the guitar; cut�ting a neat channel in the face just inside the banding. Do the same with the sides, cutting the neat channel just below the banding.
Brush some thin glue into the channel (seeing that it covers the bottom and the two walls) and then gently press the purfling in with the blade of the table-knife slightly heated over a gas flame. If the channels have been cut correctly, only gentle pressure will be needed to " bed down " the purfling.
After the glue has had time to set, the |
 |
||
|
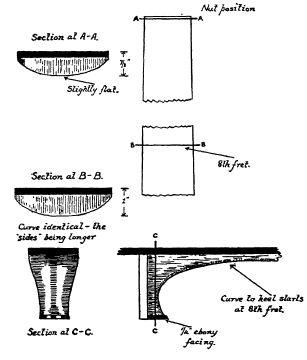
Fig. 30.�Diagram giving details of the guitar neck. |
|||
|
|
|||